
No Power to Motor Problem Fixes
As I said before, I have successfully repaired a Dareplane that I purchased off of ebay. Here is how I did it. Give it a try if you want. Remember, I was determined to get this thing working. I also have some experience ripping things apart. Don't try this unless your comfortable with the potential rewards and the potential risks!
Step 1, Evaluate the problem:
If the plane seems dead, the problem may be in the control box. By "dead," I mean that the prop does not turn at all - as if the plane were not plugged in. If the prop spins slowly, then you may have a lube or motor problem - that's something else. Tearing into the control box is a last resort.
Step 2: Let's rip it open - or should we?
Okay, the thing is dead as a doorknob. All you have is a nonworking Dareplane. May as well tear the thing open and see if we can fix it. The problem may be a broken wire (my guess is that many of these things had this problem). I have also heard that the transformer burning out was a problem as well. I have a hard time believing that (a transformer does not usually burn out within days or weeks), but in either case, you will have to open the box.
*Think twice here. If you plan on selling this thing on ebay for zillions of bucks, maybe you don't want to continue. If you are really careful you won't effect the appearance very much. In fact, I can barely tell I opened my control box. But you do have to be very careful, and VERY patient. Also realize that you may spend hours opening it and finding that nothing is wrong inside <yikes!>.
Step 3: The tools:
I used a Dremel Mototool. Sears sells them for about thirty bucks I think (under a different name I believe). This is a great tool if you don't have one. You want to get a cutting wheel for it as well. A cutting wheel is a round, thin emery wheel. Get a thin one. A thin one will do less damage aesthetically. You also need a screwdriver to pry with (gently!) as well. Also, get an eXacto (spelling?) knife to cut and pry (gently) with.
Step 4: Fire up the Dremel:
 Wait! Before you fire up the Dremel, make sure the control box is
unplugged! Also, lets turn the control box upside-down. See that rivet?
It's about dead-center,
recessed, on the bottom of the control box ... Leave it alone! It doesn't
hold the box together. To bad it doesn't. If it did, maybe the
Dareplane's could have been fixed way back when. When you open the box you
will see what it is for. If somebody already tried to get in by drilling this
out, take heart - It can be replaced with a nut and bolt.
Wait! Before you fire up the Dremel, make sure the control box is
unplugged! Also, lets turn the control box upside-down. See that rivet?
It's about dead-center,
recessed, on the bottom of the control box ... Leave it alone! It doesn't
hold the box together. To bad it doesn't. If it did, maybe the
Dareplane's could have been fixed way back when. When you open the box you
will see what it is for. If somebody already tried to get in by drilling this
out, take heart - It can be replaced with a nut and bolt.
Look at the side of the control box. Notice where the blue and white sections meet. The "line" where they meet is where we are going to cut. The white and blue portions of the box are glued internally below this seam.
At this point you may want to try gently cutting the box open with the knife and gently prying with a small screwdriver. If you are lucky, the glue may be thin and you may get away with little or no cutting. This was not the case with my Dareplane. Even if you do need to cut with the Dremel, you may reduce the amount of work needed by cutting and prying the loose sections. Take care when you cut and pry. It's easy to hack the plastic with knife slips. It is equally easy to cause stress marks if you get too brute with the screwdriver.
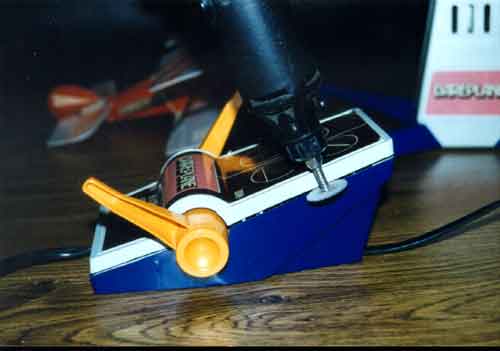
Start the Dremel up and slowly push the cutting wheel into the box on the seam. You can push it in most of the way, but don't let the spinning shaft hit the plastic case. Most of the moving parts and wires are too far recessed to be hurt by the cutting (see figure for step 6).
Be careful not to twist the Dremel if you can. That will result in a broken cutting wheel and possibly nicking the side of the box. Don't be alarmed if the wheel breaks - that WILL happen. The cutting wheels come in a bottle of twenty five or so. Just replace it and move on. Cut slowly and in short increments. Don't try to cut it all at once. Be careful when you get near the levers and box corners. You may have to stop a little short and pry the plastic apart. I think the corners were the hardest. The plastic bond was very strong, and it was difficult to cut or pry. In the end, I just carefully cut through them. Don't pry too hard or you will end up putting stress marks in the plastic! You will have to cut deep into the box. As you can see from the pictures in step 6, there are additional supports that need to be cut. These are not entirely on the edge of the box. In fact, some are in the center, out of reach of the cutting wheel.
Step 5: Finishing the cutting:
 It took me a few hours
to completely cut around the control box. I tried to gently pry with the knife
and screwdriver where I could. It may seem like you cut forever before the
box starts to "give." At first just a side or a section will
give. Gently pry it open to see and feel where it is binding. As I
mentioned before, there are plastic supports inside the box that hold it
together. I got lucky and some of the glue-holds broke loose as I pried
and cut. I did have to break one loose. I did this by reaching
inside the box with a pair of long nose pliers. I grasped the binding
support and wiggled back and forth until it broke.
It took me a few hours
to completely cut around the control box. I tried to gently pry with the knife
and screwdriver where I could. It may seem like you cut forever before the
box starts to "give." At first just a side or a section will
give. Gently pry it open to see and feel where it is binding. As I
mentioned before, there are plastic supports inside the box that hold it
together. I got lucky and some of the glue-holds broke loose as I pried
and cut. I did have to break one loose. I did this by reaching
inside the box with a pair of long nose pliers. I grasped the binding
support and wiggled back and forth until it broke.
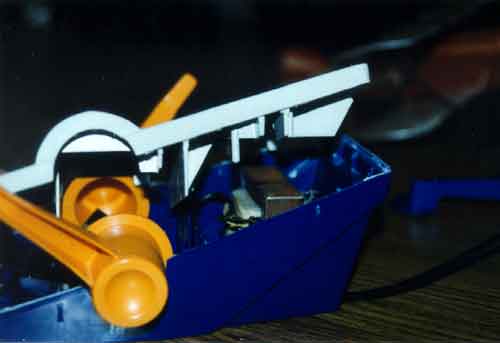
One the case is separated you should be able to open the box. Be careful, as there are a few springs under tension that you don't want to go flying. Luckily it was easy and logical to replace the parts when I was done. This part of the process seems to take forever. Don't get impatient! Take a few days if you need it. If you hurry, you may screw up.
Step 6: Okay, it's open:
 Okay ... cool ... you got it open! Now lets hope that the
problem is indeed in the control box and that all that hard work pays off!
Okay ... cool ... you got it open! Now lets hope that the
problem is indeed in the control box and that all that hard work pays off!
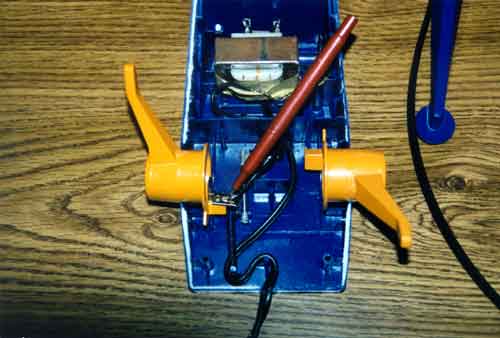
Now for the easy part. See that transformer? If you have a meter, you can check the voltage (careful!). It seems to be a standard size ... shouldn't be hard to replace. I don't remember what the output voltage is. Even more obvious. See where the pen tip is? That black wire should be crimped to that brass connector. If it isn't, you found your problem! I soldered mine so that it wouldn't happen again. But notice how the wire is attached to a constantly moving part. Even worse, the crimp job was lousy. In mine, the wire simply slipped out of the crimp connector! I'll bet this baby failed the day the poor kid got it! Sure seems like there was a better way. Also notice what the rivet on the bottom of the unit held in. Sure glad we didn't drill it out. If it was drilled out, simply replace it with a nut and bolt.
While you are in here, may as well lube this thing up. I sprayed some WD-40 in the tube that connects with the pylon. It worked wonders! The controls move much more smoothly now.
Step 7 Put it back together:
You can re-glue everything back with plastic model glue. Problem is, you may need to get into the unit again. I used good 'ol tape. works fine. I'll glue it if I sell it. If you were careful cutting the box, you will barely see the cut marks.
Hope that helps! Please send me updates. I'd love to know how you fixed your and what techniques you found!